

ThingsInNet Sensing Pro Dev Kit: Sample Code That Brings It to Life
If you’ve ever built an IoT prototype with multiple sensors, jumper wires, and add-on modules, you already know the usual pain: unstable connections, inconsistent readings, and dashboards that take longer than the normal. The ThingsInNet ESP32 Universal IoT Dev Kit – Sensing Pro is built to remove that friction and give you a clean, reliable sensing platform from day one.
And the best part is, it ships with ready-to-run Sample Code that instantly turns the board into a Wi-Fi sensor dashboard, so you can see live readings from your phone or laptop in seconds, without any router or cloud setup.
Meet the board: what you get on hardware
The Sensing Pro kit is built for real-world sensing and data logging:
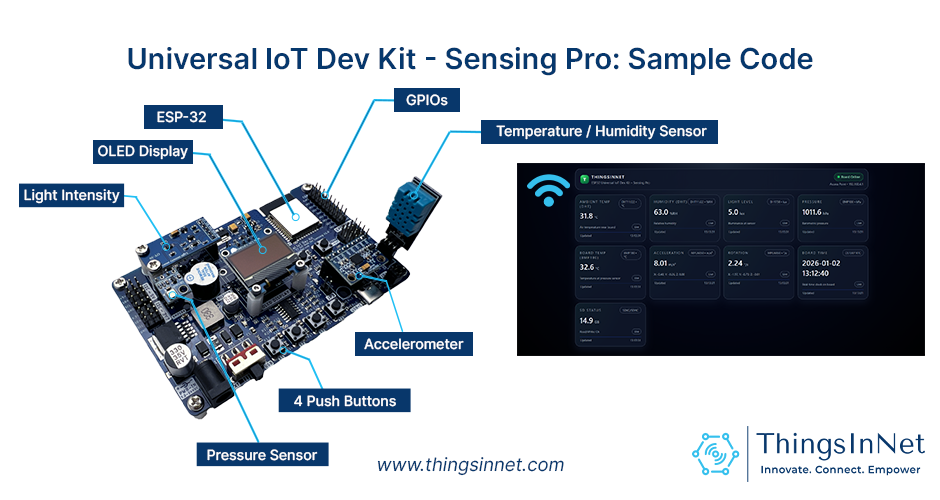
- ESP32 MCU (ESP-WROOM-32D-N8) with integrated Wi-Fi + Bluetooth
- Onboard sensors (via I2C + GPIO):
- DHT11/22 (Temperature & Humidity) – GPIO4
- BH1750 (Light / Lux) – I2C
- BMP180 (Pressure + Temperature) – I2C
- MPU6050 (Accelerometer + Gyro) – I2C
- DS1307 RTC (Timekeeping) – I2C
- 0.96” OLED (SSD1306, I2C) for device status + onboarding info
- microSD card slot for data logging and local storage
- Buzzer (GPIO26) + User LED (GPIO2) for alerts and indicators
- 4 push buttons for quick triggers / local interaction
- 8–24V input power (ideal for field deployments)
- Expansion headers for I2C, Analog, Digital IO, UART, SPI, and power rails
- Programmable using Arduino IDE, MicroPython, or ESP-IDF
What does the Sample Code do?
This firmware turns the board into a self-hosted sensor dashboard. You can run it as-is for testing or use it as a solid base for your own sensing product.
1) The ESP32 creates its own Wi-Fi network (AP Mode)
The board starts with a hotspot (example: TIN-Sensing). Your phone/laptop connects directly; no router is required. Then you open a browser view the sensor readings locally.
2) A modern web dashboard shows live sensor readings

The ESP32 hosts a web server and displays a clean UI (check the Figure above) with live values for:
- Temperature, humidity, light level (lux), pressure, board temperature
- IMU acceleration + rotation
- RTC time
- SD card status and capacity
The dashboard updates automatically (typically every few seconds).
3) “Heartbeat” connection tracking (/alive)
The webpage sends a small ping (/alive) every few seconds. If the board stops receiving it, it assumes the user disconnects and switches back to the standby display.
Recommended upgrade: For live applications, you can modify the logic to keep the last operating state active even after the client disconnects.
4) OLED shows onboarding + sensor status
- When no user is connected: OLED shows SSID, password, and IP (192.168.4.1)
- When a user is connected: OLED shows sensor/module status (OK / Failed) for quick debugging
5) Buttons + buzzer for quick local interaction
Pressing the onboard push buttons triggers the buzzer and LED, this is useful for demos, alerts, or manual triggers.
6) microSD read/write validation
The code initializes the SD card and performs a simple write/read test, so you can confirm logging readiness.
Why this Sample Code is useful (not just a demo)
Because it’s already a complete, reusable pattern:
- Local-first sensing (works without internet)
- Clean web UI + easy JSON endpoint (/readings)
- On-device status display (OLED)
- Expandable architecture: logging, alerts, rules, cloud sync without rewriting everything
Quick start (user-friendly flow)
- Power the board (USB or external power).
- Connect your phone/laptop to the board’s Wi-Fi SSID shown on the OLED.
- Open a browser and visit 192.168.4.1.
- View live readings on the dashboard.
- Confirm sensor status on the OLED.
Customize it for your project (recommended upgrades)
The Sample Code is a starter foundation. Users are encouraged to edit and customize it to match their application. In some cases, you may also add extra modules such as ADC, or additional I2C/analog sensors, depending on your requirements.
1) Make it yours (branding + access)
Change the Wi-Fi name/password and dashboard labels:
const char *ap_ssid = ” TIN-Sensing”;
const char *ap_password = “12345678”;
2) Add real deployments features
Popular upgrades users implement quickly:
- SD logging with timestamps (RTC-based logs)
- Threshold alerts (buzzer/LED + web alerts)
- Calibration offsets (temp/humidity corrections)
- STA Mode (connect to a router) + optional AP fallback
- Cloud integration (MQTT / HTTP / Firebase / ThingSpeak)
- Device security (PIN/login token for endpoints)
3) Expand sensors cleanly
If you need more analog channels, add an external ADC (I2C-based) and keep the same dashboard structure.
4) Use it across industries
The board is designed for a wide range of applications, from smart farming and environmental monitoring to robotics and research.
That means it can be installed in applications including, not limited to:
- Smart farming / greenhouse environmental monitoring
- Lab sensing and data logging for experiments
- Motion/tilt tracking prototypes (IMU-based)
- Portable field data recorder (RTC + SD logging)
- Any IoT sensing node that needs fast, reliable setup
Closing remarks and notes
The Sample Code is not “just a sample.” It’s a ready-made foundation: AP Wi-Fi + dashboard + JSON API + OLED status + multi-sensor reading + SD readiness all in one sketch. With a few edits, you can turn it into a deployable sensing product tailored to your project.
- External power is recommended for stable operation, even if USB can run it.
- Download the Sample Code, customize it, and build your own actuator controller in minutes.
- The components can be upgraded or removed for custom builds, and users can request customized versions.
- If you need customized firmware build for your exact relay/sensor set and workflow, ThingsInNet team can tailor it on request.